
Elena Canorea
Communications Lead
One of Plain Concepts’ key strengths is that we pride ourselves on doing things right by following the best practices. Achieving this is not always easy, and in many cases, it means that we must be constantly learning, researching, and testing to find out which is the best approach to do something in a wide range of different areas.
This may sound a bit overwhelming, but fortunately, sometimes there are tools that can be very helpful, and one of these tools is Sonar.
Sonar is the name that was used to refer to the SonarQube tool. This open-source tool allows you to generate a static analysis of the code of a project, detecting bad practices, possible errors, and bugs. This detection is based on a set of configurable rules which the tool will use to review and analyze all the code of your project, generating a final report that can be consulted directly on the web.
Although in the past Sonar only referred to SonarQube, nowadays more and more things are going from ‘on-prem‘ to the ‘cloud‘ and Sonar is no less. Today, just like SonarQube, a cloud version called SonarCloud is available, which is what I’ve come to talk about today.
Even though Sonar is an open-source project, that doesn’t mean it’s free. But the interesting thing here is that, although it is not free, SonarQube has a Community version and SonarCloud is free for open source projects. This means that it is possible to test it in one way or another before deciding if it is useful for you (which I’m already telling you in advance that it is).
Having said that, and since talking is easy, let’s see how we can add Sonar to our continuous integration process in Azure DevOps using SonarCloud (although the process is practically the same as if we use SonarQube).
The first thing we will obviously need is to have a SonarCloud account. To get one, just go to their website https://sonarcloud.io and click on the ‘log in’ button in the top right-hand corner:

SonarCloud is already integrated with several source code management platforms such as Github or Azure DevOps, so we are going to use one of those accounts to create our SonarCloud account. It’s that easy!
Within the SonarCloud website itself, we are going to need to do 2 things:
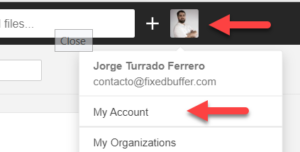
To create a token for Azure DevOps, just go to the top right, where the icon of our avatar is, and click on it. This will display a drop-down menu where you must click on ‘My Account’:
Once we’re inside, we will go to the ‘Security’ tab and assign a name for the token so that we can identify it later on in case we need to revoke it. Once the name has been assigned, click on the ‘Generate’ button. This will generate a token that we must copy and save since we will not be able to see it anymore and we will need it when we are configuring Azure DevOps:
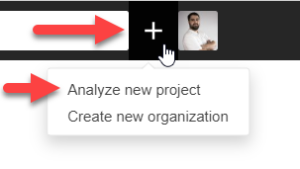
The next thing we are going to do is to create the sonar project on which we will record the metrics that are generated. To do this we will simply click on the “+” button right next to our avatar and select “Analyze new project”.
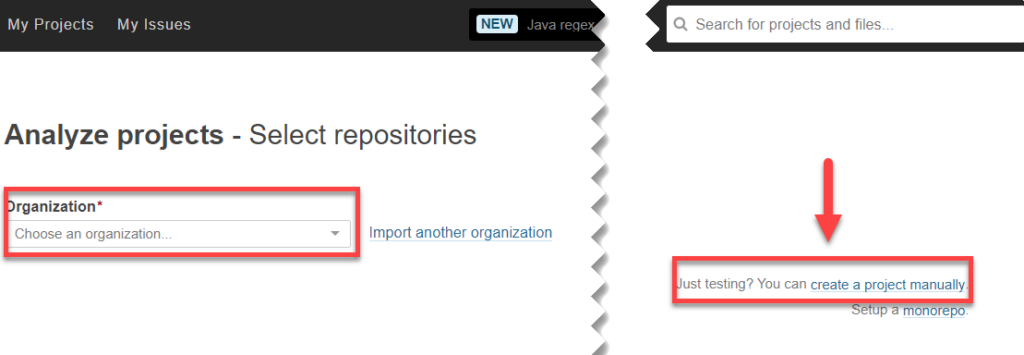
From here we are shown another window where we can choose the project from the account organization we have used (GitHub, Bitbucket, Azure DevOps,…). If you choose a repository directly from the list, SonarCloud will manage everything necessary by registering the webhooks that are needed to work.
This is fine if we want a quick and simple integration, but an option that for me personally is much more interesting is to create the project manually. In fact, this is the model that we are going to follow in this post, although it is not recommended for users without knowledge, so we are going to click on “Create a project manually”:
After that, and to finish the configuration in SonarCloud, we have to choose in which SonarCloud organization we want to create the project (or create a new one in case we do not want to put it in any existing one) and assign a key for the project, which we will later need in Azure DevOps, and a name for the project. When we are done, we simply have to press “Set Up” to create the project:
Once we have finished, we have everything ready. Let’s set up the corresponding part on Azure DevOps!
The first thing we will have to do in order to easily integrate the SonarCloud processes in Azure DevOps is to install the SonarCloud task in the organization. In case we are using SonarQube, there is also a specific task of SonarQube that we can install in the organization and that is configured practically in the same way.
Once we have the SonarCloud task installed in our organization, we will go to the Azure DevOps project properties and create a SonarCloud type service connection:
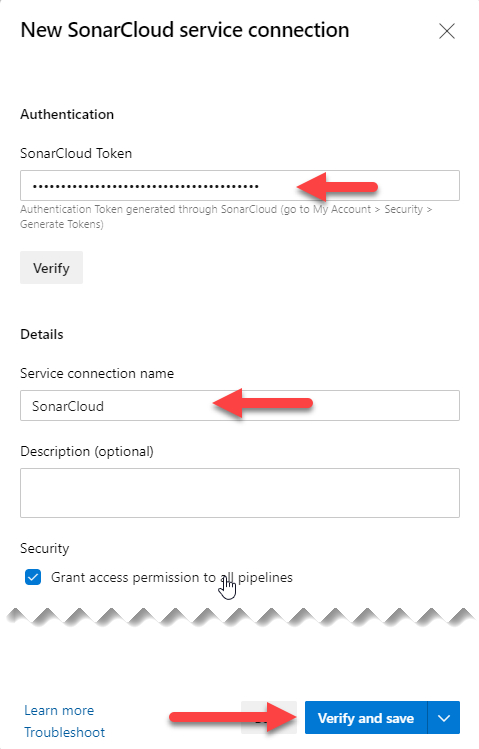
This will show us a small form where we are going to enter the token we generated in SonarCloud, and we are going to give a name to the connection. After this, just press “Verify and save” to validate the connection and save it so that we can use it in the pipelines.
With these two things ready, we will create our pipeline to perform an analysis with Sonar.
We already have everything ready to be able to do the SonarCloud static analysis automatically in our Azure DevOps pipeline, so let’s create a pipeline.
For this entry we are going to use the graphical interface pipelines because it is easier to follow for people who are not used to use the pipelines in YAML, but at the end I will leave the complete YAML for those who like me prefer to use it.
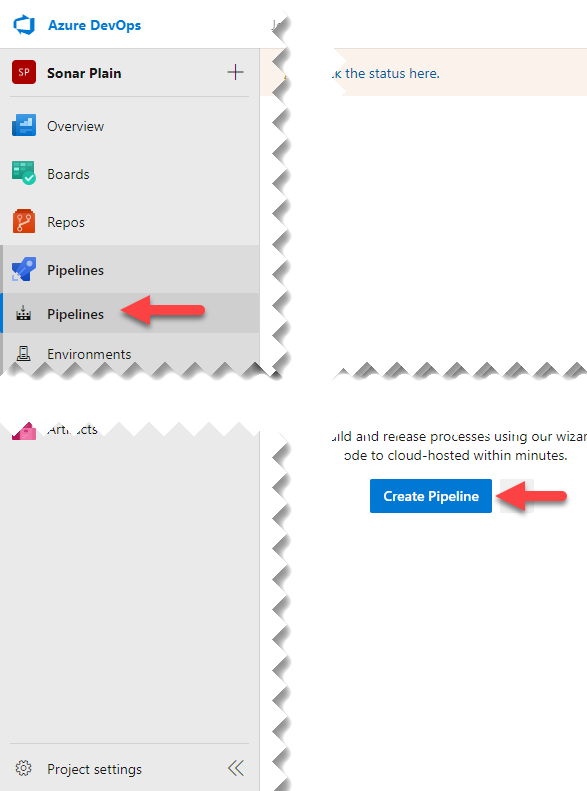
Simply click on the “Create Pipeline” button in the pipelines menu:
This will launch a form to choose the source of the code to make the pipeline, and at the bottom, we have a link to use the classic editor:
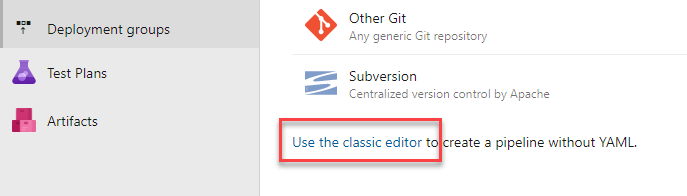
When we select that we want to use the classic editor, a new window will pop up and ask us to indicate where the repository is. Here it depends on where each person is hosting the repository, as Azure Pipelines (the CI/CD system of Azure DevOps) allows that the source code is outside of Azure DevOps, for example in Github, Bitbucket…
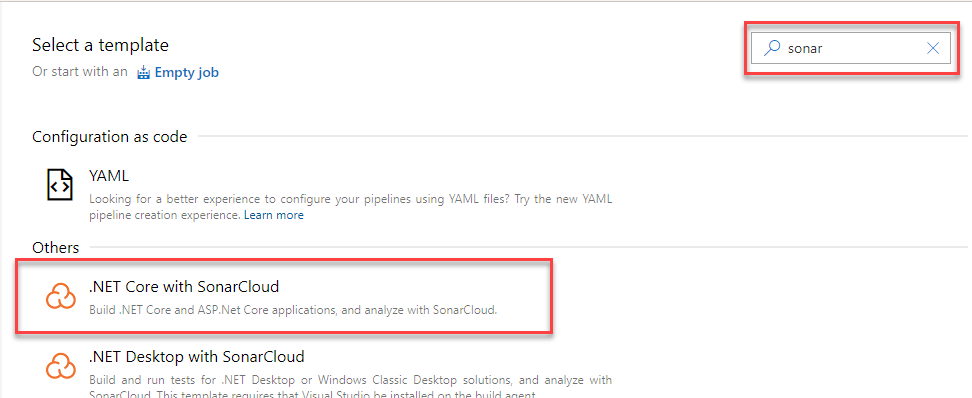
Once the repository is selected, we can choose from different pre-made templates for different purposes. In this example we will analyze a .NET Core project, so let’s just type “Sonar” son the search engine to see if there’s any template for that.
Simply select it and all the necessary tasks are created to run a standard .NET Core pipeline with the Sonar analysis ready to be configured:
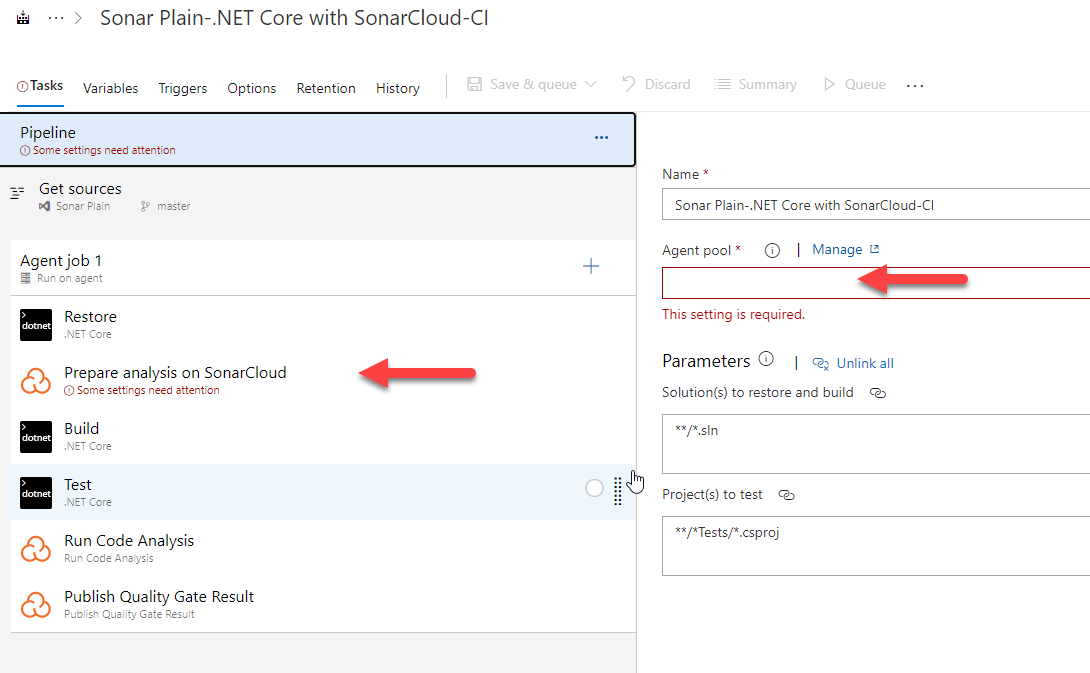
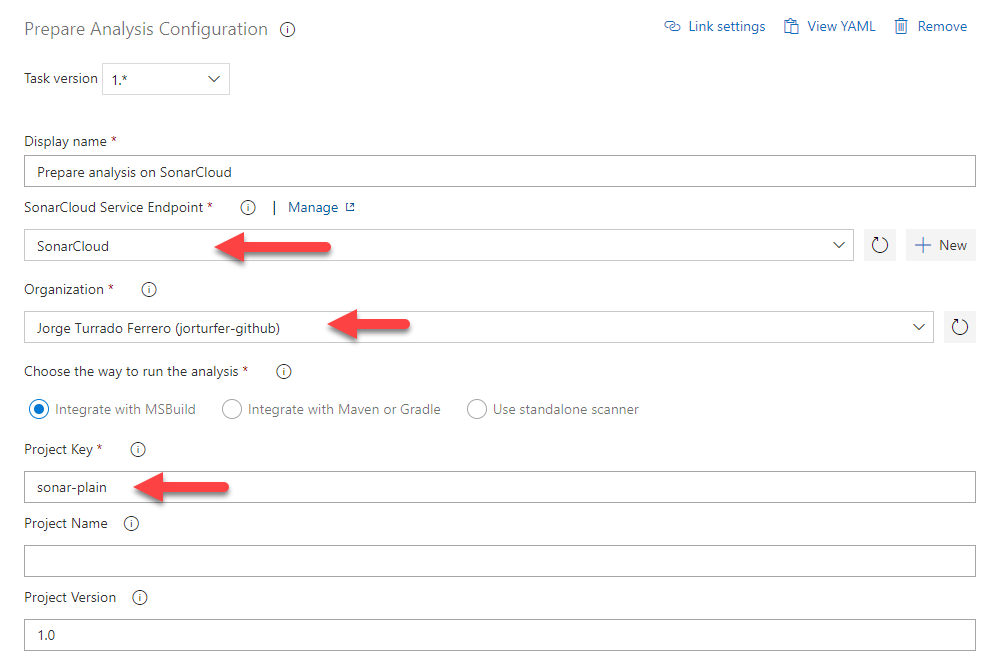
As for the selection of the agent, here there is no mystery. We will select the agent that is more convenient for us according to the language and platform for which we are compiling the solution. Then we simply select the SonarCloud preparation task (the one shown in the photo above) and configure the 3 necessary fields, which are the service connection we have previously created, the SonarCloud organization where the sonar project is hosted, and the key we indicate when creating the sonar project.
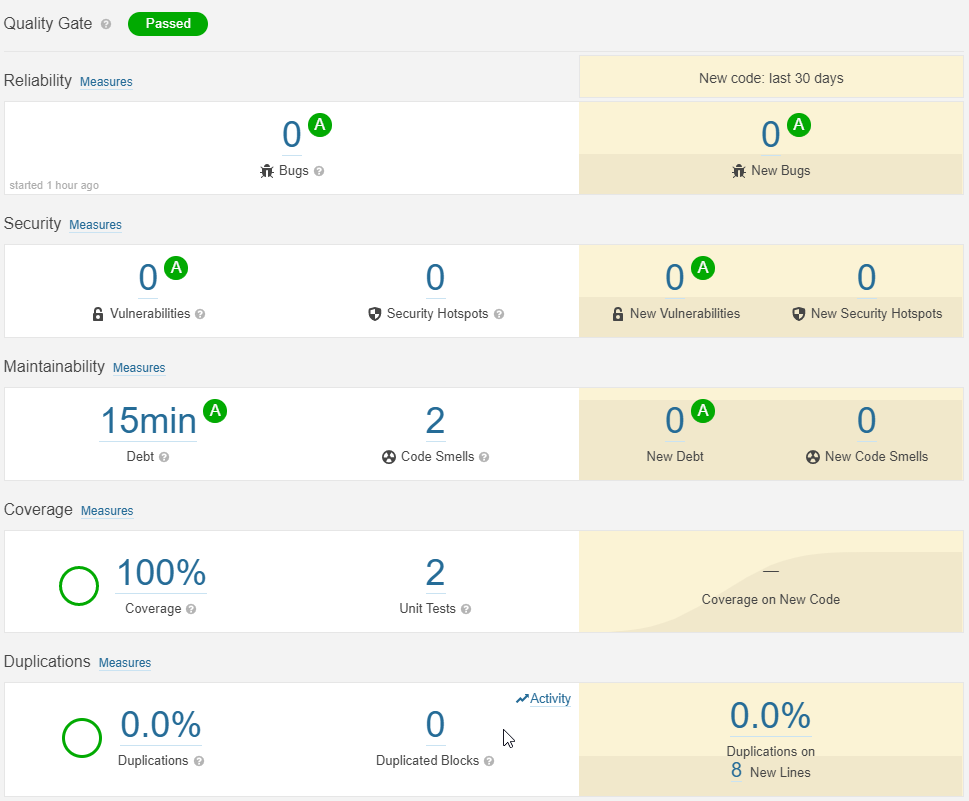
Once all of that is set up, we just have to save the pipeline and run it. If everything goes well, when we return to the project page in SonarCloud we will see that it has changed and it starts showing results about the quality of the code.
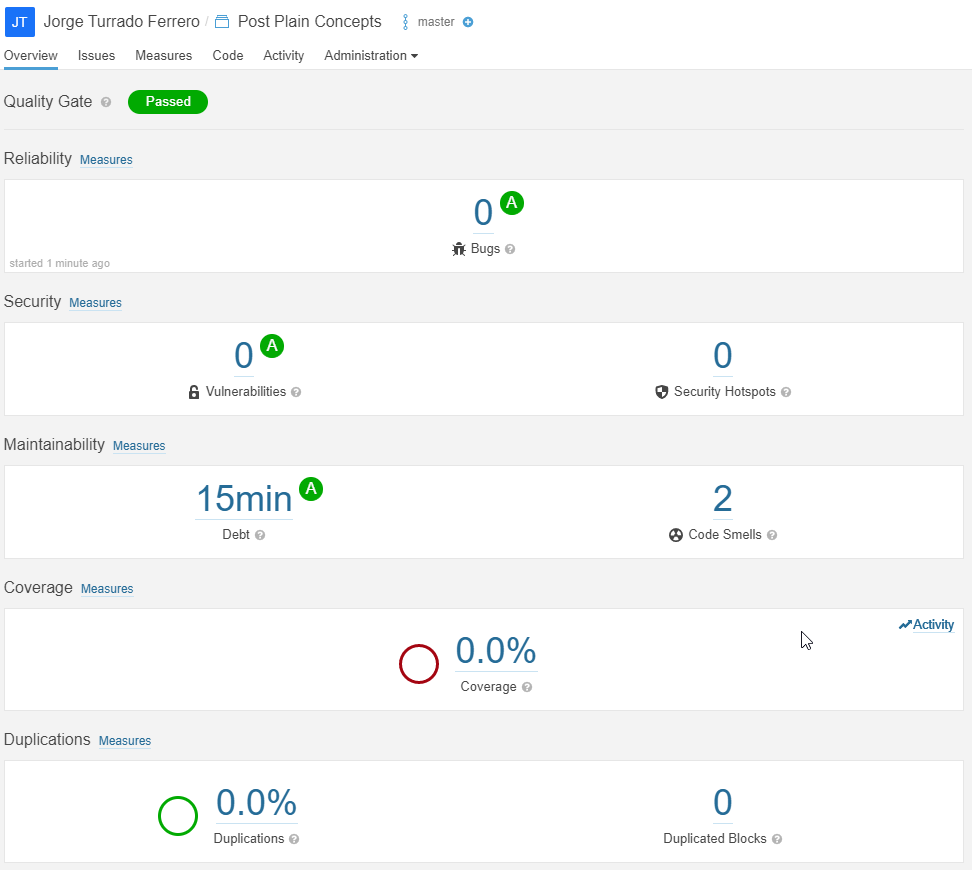
We already have the automation of code quality analysis ready and this in itself is extremely useful since we will be able to detect different problems with code quality. Without going any further, in the previous image, you can see how SonarCloud has detected two points where there is something strange in the code (I have done it on purpose, I swear!), and so it is pointing them out.
Despite that, the code coverage data is still at 0% even though my project has more. This is because Sonar by itself does not generate this data even though it can show and use it. In order to see it, it is necessary to make some small modifications to the code and the pipeline so that the coverage report is generated and sent to SonarCloud.
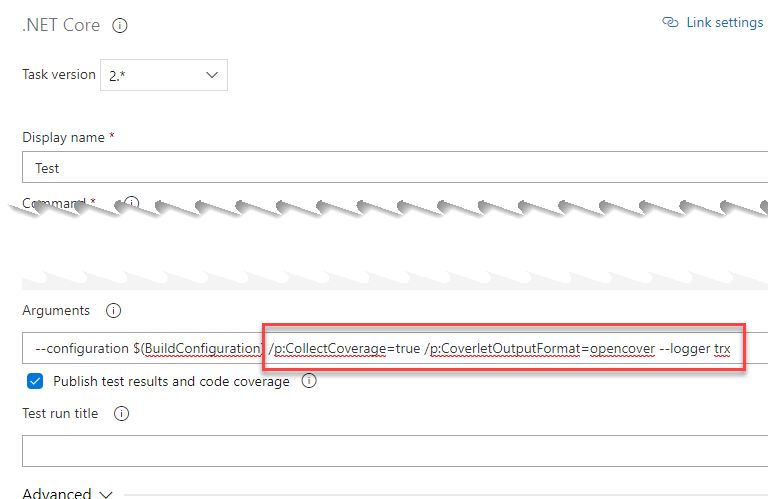
The first thing we need to do is add the NuGet package coverlet.msbuild to the testing projects. Once that’s done, we’re going to have to slightly edit the test run task so that using that NuGet package, it generates the report. To do this, in the “test” task we will add “/p:CollectCoverage=true /p:CoverletOutputFormat=opencover –logger trx” to the arguments. What this will do is tell the NuGet package to collect the coverage and save it in an opencover format:
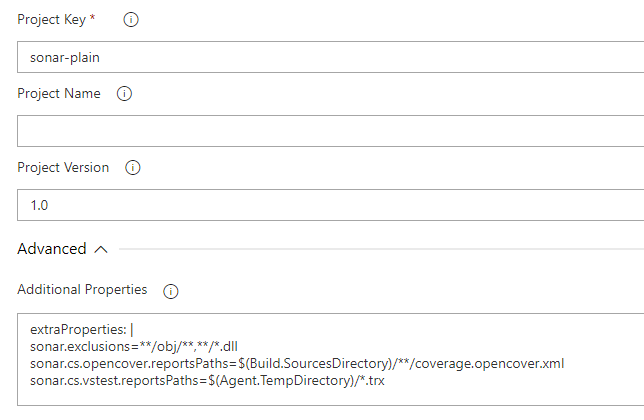
Finally, in the task of preparing SonarCloud, we are going to have to tell Sonar how to pick up the coverage we have generated adding this in the advanced section:
extraProperties: |

sonar.exclusions=**/obj/**,**/*.dll

sonar.cs.opencover.reportsPaths=$(Build.SourcesDirectory)/**/coverage.opencover.xml

sonar.cs.vstest.reportsPaths=$(Agent.TempDirectory)/*.trx
Once we have made these small changes, we only need to run the pipeline to have available a report in which we now collect the execution of the tests and their coverage.
And as I mentioned before, here’s the YAML:
pool:
  vmImage: 'windows-latest'
  demands: java

steps:
- task: UseDotNet@2
  inputs:
    packageType: 'sdk'
    version: '3.1.301'
- task: DotNetCoreCLI@2
  displayName: Restore
  inputs:
    command: 'restore'
    projects: '**/*.sln'

- task: SonarSource.sonarcloud.14d9cde6-c1da-4d55-aa01-2965cd301255.SonarCloudPrepare@1
  displayName: 'Prepare analysis on SonarCloud'
  inputs:
    SonarCloud: SonarCloud
    organization: 'jorturfer-github'
    projectKey: 'sonar-plain'
    extraProperties: |
     sonar.exclusions=**/obj/**,**/*.dll
     sonar.cs.opencover.reportsPaths=$(Build.SourcesDirectory)/**/coverage.opencover.xml
     sonar.cs.vstest.reportsPaths=$(Agent.TempDirectory)/*.trx

- task: DotNetCoreCLI@2
  displayName: Build
  inputs:
    projects: '**/*.sln'
    arguments: '--configuration Release'

- task: DotNetCoreCLI@2
  displayName: Test
  inputs:
    command: test
    projects: '**/*.sln'
    arguments: '--configuration Release /p:CollectCoverage=true /p:CoverletOutputFormat=opencover --logger trx'

- task: SonarSource.sonarcloud.ce096e50-6155-4de8-8800-4221aaeed4a1.SonarCloudAnalyze@1
  displayName: 'Run Code Analysis'

- task: SonarSource.sonarcloud.38b27399-a642-40af-bb7d-9971f69712e8.SonarCloudPublish@1
  displayName: 'Publish Quality Gate Result'
Elena Canorea
Communications Lead
