
Elena Canorea
Communications Lead
These are turbulent times we live in these days and keeping ourselves busy is a good way to handle the situation. That is why today we’re going to talk about how to create a highly-availability database using MongoDB and its Replica Set feature. A few weeks ago we talked about how to create high-performance applications, both in terms of writing high-performance code and logger, but no matter how well a system works in terms of performance… What can we do if we work with a database which has a failure? What’s the point of optimizing if the database is going to crash?
If the system simply stops working, that’s all there is to it. In order to solve these situations when we can’t tolerate that the system fails, high availability systems are used, which is nothing more than the fact that there is a redundancy in the elements. Although this is a rough explanation, what we achieve by making elements redundant is that if one fails another one can continue providing the service while the situation is being fixed.
This is something relatively simple to solve when we have an API that we call and work against. If the API lacks status we just call another instance and everything works fine. The situation gets more complicated when the data it contains has to be shared between the different instances of the service. Once again, if we take the example of an API, the status could be persisted in a database from which all the instances consume the status data. But where do we share the data if what we want is a redundant database?
In the case of a database, it seems clear that it is not enough to point to another one since it won’t have the data registered on the tables.
Okay, we just stated that a high-availability database is not something banal and that changing from one instance to another is not enough. So, how does a high-availability database work?
In order to get a database to work in high availability, we are going to need to group different instances and get them to behave as one (cluster). How to do this depends a lot on the type of database engine we are using. Some engines support this additionally while others were created from the beginning to be able to work in a distributed way. It is not the same to set up a SQL Server in high availability than a MongoDB one, neither in the necessary hardware nor in the configuration work.
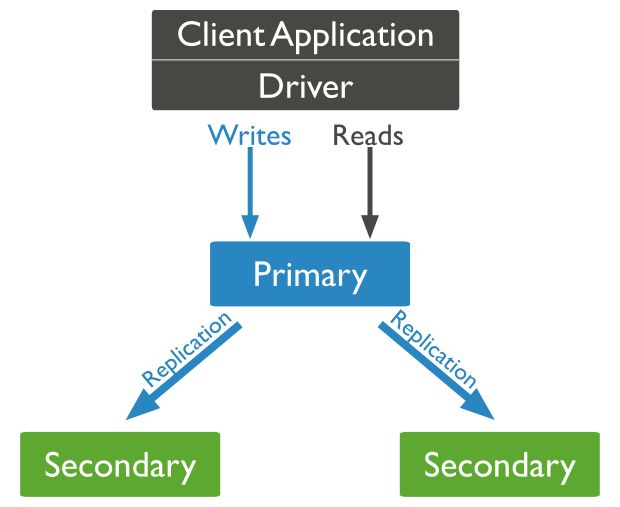
MongoDB is a NoSQL document database that was designed to work in a distributed way using the master-slave model with up to 50 nodes as of today. The fact that it is a master-slave means that the writing operations must be performed on the master and this is the one who is in charge of replicating the data on the rest of the nodes in the system. Although it may seem that if the master falls the system stops working, MongoDB is designed to work in high availability and has the ability to make the slave nodes choose a new master in the event that it fails.
This is the operating diagram:
If you are interested in knowing in depth how the replication works in MongoDB, you can check the official documentation here.
Our applications will connect directly to the primary node and this is the one that will ensure that the data is replicated over the secondary nodes.
To achieve this high availability operation in MongoDB, there is the concept of ReplicaSet. This ReplicaSet is the set of the different nodes (MongoDB instances) connected between them so that we get high availability.
One of the advantages of MongoDB is that it has been designed to work in a distributed manner so that if one node fails, the rest can take over and the system is not affected. Although today a ReplicaSet supports up to 50 nodes, the minimum number of nodes to have a MongoDB in high availability is 2. That’s why it is necessary that MongoDB is running in at least two servers.
MongoDB does not work with default configuration files, so you can indicate the different configurations when you start by using command parameters, or create a configuration file and indicate at startup that we want to use it. To do this, just start the process using:
mongod --config <ruta al fichero de configuración>
Once we have clear how to start the MongoDB instance to work with a configuration file, we are going to create it and add in it the net.bindingIp property to make each instance listen to requests from the IPs of the rest of the instances. If we do not do it, we could only make calls from localhost to that MongoDB instance and we could not create the ReplicaSet.
MongoDB supports different configuration file formats, but for its simplicity, we will use YAML. For example, our configuration file right now would be something like this:
net:
   bindIp: localhost,<ip address>,<ip address>
We can indicate several IPs using comma ‘,’ between the different IPs. If you want to allow calls from any address, just use ‘::’ for any IPv6 address and ‘0.0.0.0’ for any IPv4 address.
On that same file, we are going to add the name of the ReplicaSet to which the instance with the property replication.replSetName belongs. In this case, I have called it rs0, so my complete configuration file is like this:
net:
   bindIp: ::,0.0.0.0
replication:
   replSetName: "rs0"
These two configuration properties have to be in each of the nodes that will compose the ReplicaSet since all the nodes have to be accessible to each other and share ReplicaSet. It is not relevant if a node is configured by file and another by parameters, but they have to be configured.
With this, we are ready to go! We will enter each of the MongoDB servers using the mongo client simply by running from the local console (of each server):
mongo
And in each of them we will create a user:
use admin
db.createUser(
  {
    user: "admin",
    pwd: "password",
    roles: [ { role: "userAdminAnyDatabase", db: "admin" }, "readWriteAnyDatabase" ]
  }
)
Let’s summarize, we have several instances of mongo running, all configured to work in high availability. Is it all done? Well, not yet… With these small steps we have managed to have everything ready, but now we still need to actually start everything.
From any of the servers but only using one, we are going to enter the console and we are going to execute rs.initiate() indicating the data of the servers. For example in my case:
rs.initiate(
  {
    _id : "rs0",
    members: [
      { _id : 0, host : "40.118.22.136:27017" },
      { _id : 1, host : "13.73.148.195:27017" },
      { _id : 2, host : "13.73.144.190:27017" }
    ]
  }
)
In this command, apart from other data that we could inform you if necessary, we are indicating the name of the ReplicaSet, as well as the address of each of its members. Once the command is executed we can use rs.status() to see the status of the cluster:
rs0:PRIMARY> rs.status()
{
        "set" : "rs0",
        "date" : ISODate("2020-03-22T00:11:25.958Z"),
        "myState" : 1,
        "term" : NumberLong(6),
        "heartbeatIntervalMillis" : NumberLong(2000),
        "optimes" : {
                "lastCommittedOpTime" : {
                        "ts" : Timestamp(1584835883, 1),
                        "t" : NumberLong(6)
                },
                "readConcernMajorityOpTime" : {
                        "ts" : Timestamp(1584835883, 1),
                        "t" : NumberLong(6)
                },
                "appliedOpTime" : {
                        "ts" : Timestamp(1584835883, 1),
                        "t" : NumberLong(6)
                },
                "durableOpTime" : {
                        "ts" : Timestamp(1584835883, 1),
                        "t" : NumberLong(6)
                }
        },
        "members" : [
                {
                        "_id" : 0,
                        "name" : "40.118.22.136:27017",
                        "health" : 1,
                        "state" : 1,
                        "stateStr" : "PRIMARY",
                        "uptime" : 1702,
                        "optime" : {
                                "ts" : Timestamp(1584835883, 1),
                                "t" : NumberLong(6)
                        },
                        "optimeDate" : ISODate("2020-03-22T00:11:23Z"),
                        "electionTime" : Timestamp(1584834202, 1),
                        "electionDate" : ISODate("2020-03-21T23:43:22Z"),
                        "configVersion" : 1,
                        "self" : true
                },
                {
                        "_id" : 1,
                        "name" : "13.73.148.195:27017",
                        "health" : 1,
                        "state" : 2,
                        "stateStr" : "SECONDARY",
                        "uptime" : 1694,
                        "optime" : {
                                "ts" : Timestamp(1584835883, 1),
                                "t" : NumberLong(6)
                        },
                        "optimeDurable" : {
                                "ts" : Timestamp(1584835883, 1),
                                "t" : NumberLong(6)
                        },
                        "optimeDate" : ISODate("2020-03-22T00:11:23Z"),
                        "optimeDurableDate" : ISODate("2020-03-22T00:11:23Z"),
                        "lastHeartbeat" : ISODate("2020-03-22T00:11:25.174Z"),
                        "lastHeartbeatRecv" : ISODate("2020-03-22T00:11:25.173Z"),
                        "pingMs" : NumberLong(0),
                        "syncingTo" : "40.118.22.136:27017",
                        "configVersion" : 1
                },
                {
                        "_id" : 2,
                        "name" : "13.73.144.190:27017",
                        "health" : 1,
                        "state" : 2,
                        "stateStr" : "SECONDARY",
                        "uptime" : 1679,
                        "optime" : {
                                "ts" : Timestamp(1584835883, 1),
                                "t" : NumberLong(6)
                        },
                        "optimeDurable" : {
                                "ts" : Timestamp(1584835883, 1),
                                "t" : NumberLong(6)
                        },
                        "optimeDate" : ISODate("2020-03-22T00:11:23Z"),
                        "optimeDurableDate" : ISODate("2020-03-22T00:11:23Z"),
                        "lastHeartbeat" : ISODate("2020-03-22T00:11:25.174Z"),
                        "lastHeartbeatRecv" : ISODate("2020-03-22T00:11:24.934Z"),
                        "pingMs" : NumberLong(0),
                        "syncingTo" : "13.73.148.195:27017",
                        "configVersion" : 1
                }
        ],
        "ok" : 1,
        "operationTime" : Timestamp(1584835883, 1),
        "$clusterTime" : {
                "clusterTime" : Timestamp(1584835883, 1),
                "signature" : {
                        "hash" : BinData(0,"AAAAAAAAAAAAAAAAAAAAAAAAAAA="),
                        "keyId" : NumberLong(0)
                }
        }
}
In addition to the information about the cluster itself, we can find things like information about each node. Some useful information about the node tells us if it is primary or secondary when the last life beat arrived, or the time it has been running.
Now we have a MongoDB database in high availability!
Right now, we have a MongoDB cluster in high availability ready and working, but what happens if we have to add or delete nodes?
Imagine that for whatever reason one of the cluster servers is going to stop for a while to do certain tasks. For the cluster itself to be able to choose the master, most of the nodes in the cluster have to be available.
In a 4-node cluster, most are 3, if we are already removing one of the 4 to do maintenance but the cluster does not know it when one fails, then it will not be able to choose a new master since it needs 3 nodes to agree, and we only have 2 left… (remember that the cluster thinks it has 4).
For this, MongoDB offers us 2 simple commands that we can execute from the primary server and will allow us to add and remove nodes from the cluster. These commands are rs.remove() and rs.add().
These commands receive as a parameter the address of the node we want to add or remove and makes everything to be configured to continue working. For example, in my case, if I want to remove a node and add it again after I finish my work, it would be something like this:
 rs.remove("13.73.144.190:27017")
........
 rs.add("13.73.144.190:27017")
MongoDB is a more than proven and very robust NoSQL database that we can use in our developments without any problem, but we have to take into account that it is not a relational database.
This has its advantages and disadvantages, and the fact that replication and high availability are easily achieved does not remove the need to study whether it is an appropriate solution or not. It is a database designed to work in a distributed manner and that is what makes MongoDB so easy to use in high availability.
To conclude, in this entry we have talked about the operation of MongoDB and have made a basic configuration of a ReplicaSet. What I am looking for writing this entry is not to explain 100% the intricacies of MongoDB and the different configurations that it offers, since that gives for a book (and in fact there are), but to talk about a powerful NoSQL engine and to put an example of how to create a high availability.
If you have any specific doubts about how to do it or how to design the system in particular, leave me a comment or a message and we will see the case more thoroughly.
Everything we have stated is very good, but the reality is that it is not practical to have to create a cluster of MongoDB for day-to-day development. In order to easily achieve a MongoDB cluster locally, we can use a docker and create it in a very simple way.
The first thing we will need is to have Docker installed (of course) and create a docker-compose.yml file like this one:
version: "3"
services:
  mongo0:
    hostname: mongo0
    container_name: mongo0
    image: mongo
    environment:
      MONGO_INITDB_ROOT_USERNAME: root
      MONGO_INITDB_ROOT_PASSWORD: example
    ports:
      - 27017:27017
    restart: always
    entrypoint: [ "/usr/bin/mongod", "--bind_ip_all", "--replSet", "rs0" ]
  mongo1:
    hostname: mongo1
    container_name: mongo1
    image: mongo
    environment:
      MONGO_INITDB_ROOT_USERNAME: root
      MONGO_INITDB_ROOT_PASSWORD: example
    ports:
      - 27018:27017
    restart: always
    entrypoint: [ "/usr/bin/mongod", "--bind_ip_all", "--replSet", "rs0" ]
  mongo2:
    hostname: mongo2
    container_name: mongo2
    image: mongo
    environment:
      MONGO_INITDB_ROOT_USERNAME: root
      MONGO_INITDB_ROOT_PASSWORD: example
    ports:
      - 27019:27017
    restart: always
    entrypoint: [ "/usr/bin/mongod", "--bind_ip_all", "--replSet", "rs0" ]

  mongo-express:
    container_name: mongo-client
    image: mongo-express
    restart: always
    ports:
      - 8081:8081
    environment:
      ME_CONFIG_MONGODB_ADMINUSERNAME: root
      ME_CONFIG_MONGODB_ADMINPASSWORD: eample
      ME_CONFIG_MONGODB_SERVER: "mongo0,mongo1,mongo2"
Thanks to this docker-compose file we are going to create 3 instances of MongoDB and we are also going to build a web client where we can see that everything works.
We are simply going to run it:
docker-compose up -d
And once the containers are lifted, we’ll enter any instance of mongo and we’ll start the Replica Set. For example, if we were to choose the mongo0 container:
docker exec -it mongo0 mongo
# Y una vez dentro de mongo
config={"_id":"rs0","members":[{"_id":0,"host":"mongo0:27017"},
{"_id":1,"host":"mongo1:27017"},{"_id":2,"host":"mongo2:27017"}]}
rs.initiate(config)
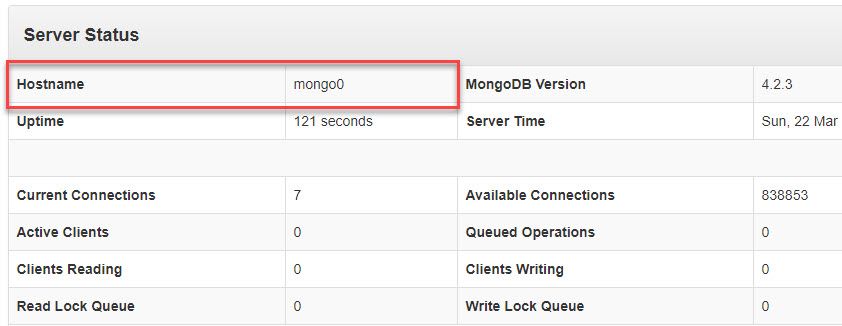
With this, we have already created the Replica Set and we have a mongo database in high availability running everything locally on docker. We can see that everything is working if we enter the web client at http://localhost:8081/. In fact, we can easily verify that the primary node choices are occurring simply by stopping the primary node container and refreshing the web. In the hostname section, we are going to see which node is acting as the primary.
Thanks to docker it is very easy to play with MongoDB and test what happens when a node fails, or to mount a cluster of more than 2-3 nodes. I thought it was useful to add this last section on how to do the same with docker so that you can try and play with MongoDB, as it is a very interesting option. But remember, docker is not ideal to put a database in high availability in production environments, use it only for development and testing purposes.
Post originally published in Fixebuffer.com
Elena Canorea
Communications Lead
