
Elena Canorea
Communications Lead
A few days ago I came here to talk about code quality and how to measure and quantify it with SonarCloud. While it is true that doing things as good as possible is one of the things I like the most about working at Plain Concepts, being able to play with different technologies and scenarios is the other highlight of my work.
Each project is different and each client has its own needs and requirements, and it is precisely one of those projects that I have come to talk about today.
One of our customers is using Smart Concepts, which is our Azure-based IoT solution. This solution ingests data from different devices within a processing plant and uses it to feed monitoring panels and predictive systems based on Artificial Intelligence. So far we could be talking about a fairly common IoT scenario today.
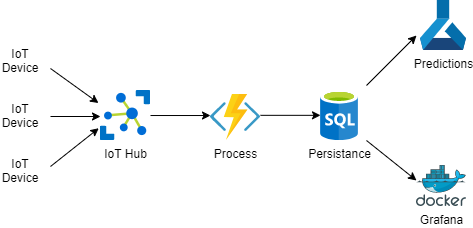
Once the prediction models were trained, they were used to detect certain types of business-critical alarms.
With this system, the client is able to solve the vast majority of scenarios simply by adapting, if necessary, the processing of the ingested data to make the necessary transformations and training their new prediction models.
The issue here is that once the system is validated, the client wanted to expand it to other areas of their business. The data handled by these other areas is of a more sensitive nature than the one that was originally managed by the platform. It is not the same to make predictions about when a machine is going to break down as it is about medical records, for example.
Because of the sensitivity of the data being processed, it must be processed directly in the customer’s own physical infrastructure and not released onto the Internet.
This leaves the door open to different solutions with their corresponding challenges. Deploying something “on-prem” forces you to consider certain things, such as hosting models (existing or new servers), distribution models (installers, scripts, docker), or simply update methods. For example, the latter, updating, may seem a totally banal issue until you realize that predictive models are iterative and may require retraining with some frequency.
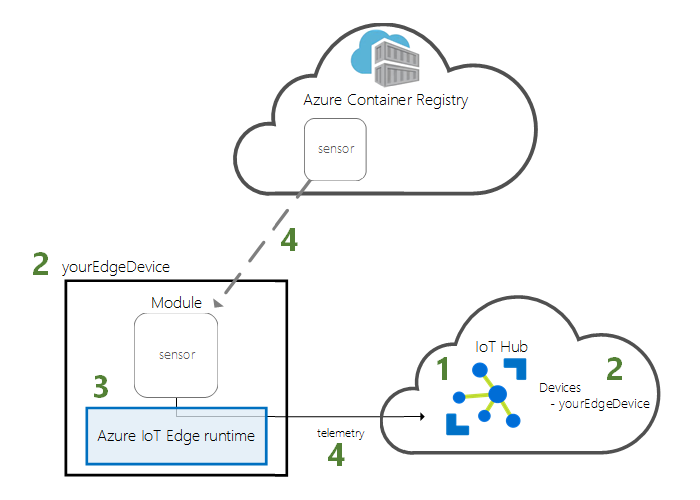
For those who do not know, IoT Edge is a service that allows you to deploy from IoT Hub different workloads on different connected devices. In more simple terms, we will be able to deploy Docker containers on different machines that we have previously configured with the IoT Edge runtime. While this model does not eliminate the hosting problem, it does eliminate the distribution and update problem at a stroke, we will distribute Docker images and the runtime will take care of applying the updates we make on IoT Hub.
The IoT Edge runtime supports both Windows and Linux, so the amount of devices where it can be installed is huge and it will be a rare case where this system cannot be used.
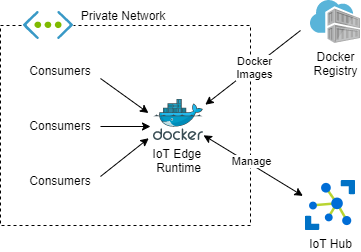
With this new approach, we have achieved that our prediction models are within the customer’s own network so that their data does not travel over the Internet or leave it, but we can still control remotely and centrally the models that are being used.
And once again: Talk is cheap, show me the code!
The first thing we will need is to meet a number of simple prerequisites:
just run az extension add -- name azure-iot)The first thing we will do is to run this command from the PowerShell:
. {Invoke-WebRequest -useb aka.ms/iotedge-win} | Invoke-Expression; ` Initialize-IoTEdge -ContainerOs Linux
This command is going to install the runtime for Linux containers on a Windows computer, if we want Windows containers, we should change the -ContainerOs parameter
Once the process is over, it will ask us to restart. All you have to do is to say yes and the process will continue. Once the computer has restarted, and from a PowerShell again, we are going to execute the command:
. {Invoke-WebRequest -useb aka.ms/iotedge-win} | Invoke-Expression; Initialize-IoTEdge -ContainerOs Linux
This will start an interactive process where we will configure the computer as an IoT Edge device. This process will ask us for the device’s connection chain. In order to do that, we will first have to create an IoT device in IoT Hub and get its connection string. We will be able to get this by running:
az iot hub device-identity create --device-id myEdgeDevice --edge-enabled --hub-name myIoTHub

az iot hub device-identity show-connection-string --device-id myEdgeDevice --hub-name myIoTHub
With these two commands, we will first create a device called myEdgeDevice on the myIoTHub IoT Hub with the IoT Edge flag set, and then we simply get its connection string.
Once the initialization process is over, we will have our IoT Edge device configured. If everything went well, we should be able to run:
iotedge list
And get a result like this:
NAME      STATUS   DESCRIPTION   CONFIG

edgeAgent running  Up 45 seconds mcr.microsoft.com/azureiotedge-agent:1.0
IoT Hub allows you to deploy various workloads (modules) that you can download from the marketplace, but in this case what we wanted was to deploy our own models that were already in our own Azure Conteiner Registry (acr). Although this can also be done from the graphical interface, for this example I will use az cli since it is what we see to be able to automate as part of our CI/CD processes.
This becomes a little more tedious since we will have to generate a json file with all the content to be displayed and make the corresponding token replacements to suit the versions we want to deploy. Anyway, for this example, we will make a simple deployment of a simple nginx.
{
    "modulesContent": {
        "$edgeAgent": {
            "properties.desired": {
                "modules": {
                    "nginx": {
                        "settings": {
                            "image": "nginx",
                            "createOptions": "{\"ExposedPorts\":{\"80/tcp\":{}},\"HostConfig\":{\"PortBindings\":{\"80/tcp\":[{\"HostPort\":\"80\"}]}}}"
                        },
                        "env": {
                            "MyVar1": {
                                "value": "value1"
                            }
                        },
                        "type": "docker",
                        "version": "1.0",
                        "status": "running",
                        "restartPolicy": "always"
                    }
                },
                "runtime": {
                    "settings": {
                        "minDockerVersion": "v1.25",
                        "registryCredentials": {
                            "MyACR": {
                                "address": "MyACRUrl",
                                "password": "MyACRPassword",
                                "username": "MyACRUser"
                            }
                        }
                    },
                    "type": "docker"
                },
                "schemaVersion": "1.0",
                "systemModules": {
                    "edgeAgent": {
                        "settings": {
                            "image": "mcr.microsoft.com/azureiotedge-agent:1.0",
                            "createOptions": ""
                        },
                        "type": "docker"
                    },
                    "edgeHub": {
                        "settings": {
                            "image": "mcr.microsoft.com/azureiotedge-hub:1.0",
                            "createOptions": "{\"HostConfig\":{\"PortBindings\":{\"443/tcp\":[{\"HostPort\":\"443\"}],\"5671/tcp\":[{\"HostPort\":\"5671\"}],\"8883/tcp\":[{\"HostPort\":\"8883\"}]}}}"
                        },
                        "type": "docker",
                        "status": "running",
                        "restartPolicy": "always"
                    }
                }
            }
        },
        "$edgeHub": {
            "properties.desired": {
                "routes": {
                    "route": "FROM /messages/* INTO $upstream"
                },
                "schemaVersion": "1.0",
                "storeAndForwardConfiguration": {
                    "timeToLiveSecs": 7200
                }
            }
        },
        "nginx": {
            "properties.desired": {}
        }
    }
}
Inside the agent modules, we are going to add a section for each image that we want to display. We are going to analyze in detail the module:
"nginx": {
    "settings": {
        "image": "nginx",
        "createOptions": "{\"ExposedPorts\":{\"80/tcp\":{}},\"HostConfig\":{\"PortBindings\":{\"80/tcp\":[{\"HostPort\":\"80\"}]}}}"
    },
    "env": {
        "MyVar1": {
            "value": "value1"
        }
    },
    "type": "docker",
    "version": "1.0",
    "status": "running",
    "restartPolicy": "always"
}
In the settings section, we are indicating the image and the creation options, such as port bindings, volumes, or everything that we need to be sent to the Docker API, then we configure the different environment variables that we are interested in using and finally, we indicate the restart policy that we want it to have (in addition to other parameters such as the type or version of the module).
For this example I have used DockerHub’s nginx image, but normally we use a private acr, so in the runtime section, we are going to configure all the image records we need:
"runtime": {
    "settings": {
        "minDockerVersion": "v1.25",
        "registryCredentials": {
            "MyACR": {
                "address": "MyACRUrl",
                "password": "MyACRPassword",
                "username": "MyACRUser"
            }
        }
    },
    "type": "docker"
}
Once we have the json ready, just run this, indicating the name of the IoT device, the name of the IoT Hub, and the route to the json.
az iot edge set-modules --device-id myEdgeDevice --hub-name MyIoTHubPlain --content deployment.json
If everything went well, we should doiotedge list and get something like that:
NAME      STATUS    DESCRIPTION    CONFIG

edgeAgent running   Up 38 minutes  mcr.microsoft.com/azureiotedge-agent:1.0

edgeHub   running   Up 29 minutes  mcr.microsoft.com/azureiotedge-hub:1.0

nginx     running   Up 1 second    nginx:latest
Also, having deployed an nginx, if we open in a browser the address http://localhost, we should find the nginx welcome page.
IoT scenarios have become much more than just collecting metrics and sending them somewhere. More and more we want our devices to be smarter and smarter, work better, be updated more frequently, or simply better protect our data and privacy.
IoT Edge allows us to meet all these objectives without losing sight of the product lifecycle and iterative deployment methods, giving us the best of both worlds by being able to control everything from a central cloud point, but deploy and run in distributed “on-prem” points.
Elena Canorea
Communications Lead
